There are no mechanical contacts in the E-Timer to wear out or need cleaning.
The main limitation of the timer used in
the Model T ignition system is that it is a mechanical switch. It is an
unfortunate feature of any mechanical switch that wear will take place
because of the friction of contacts moving against each other. This eventually
reveals itself in the form of intermittent connections and, and in the
case of a Ford timer, poor timing. Many timer designs were developed in
the Model T era, each supposed to be an improvement on its rivals, but
the problem still exists to a lesser or greater degree.
It was of considerable interest therefore,
when an electronic timer became available. Like the ECCT which I reviewed
here,
the E-Timer was also developed by Mike Kossor in the U.S. I have
been able to try one out, and familiarise myself with all the aspects of
installation and performance.
What is the E-Timer?
In simple terms, the E-Timer is a drop
in substitute for the mechanical timer. It looks the same, being built
into an Anderson timer casing (although for the purist can be built into
the original roller timer casing), and uses the original wiring and coils.
Unlike distributor or True-Fire conversions, once installed, the E-Timer
installation looks completely original in every way.
There are no mechanical
contacts in the E-Timer to wear out or need cleaning.
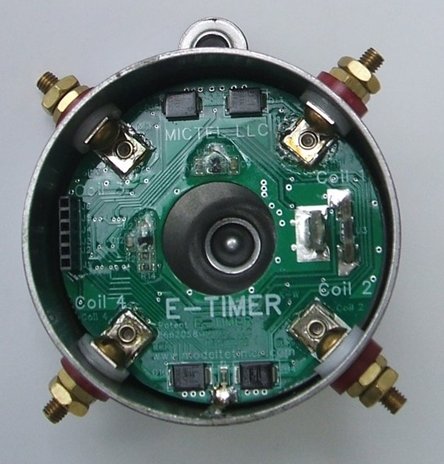
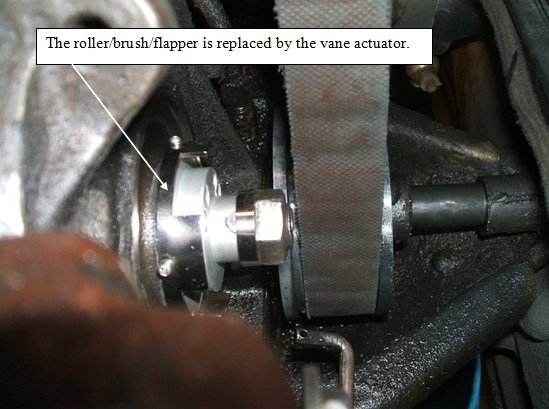
In place of the timers mechanical contacts
are transistors that switch each of the coils in turn. Cam shaft position
is determined with a magnetic Hall-effect sensor and rotating vane. Included
in the circuity is a microprocessor which provides a number of interesting
features, such as automatic timing advance, and the ability to take over
the points and capacitor function of the coils. What this means is that
your coils do not need to have functioning or correctly adjusted points,
and nor does the capacitor need to be in good order. Only the coil windings
need to be functional. This aspect of the E-Timer is a huge advantage for
those who are unable to rebuild or correctly adjust their coils, but who
prefer the original Ford ignition.
Because there are no moving parts that
can wear, timing is always perfect, and will remain so indefinitely. Neither
will the coils have to be adjusted ever again. In effect, the E-Timer is
providing all the advantages of electronic ignition, but with keeping the
original four coils and wiring intact. It is a perfect example of how modern
technology can improve the Model T without actually changing the car.
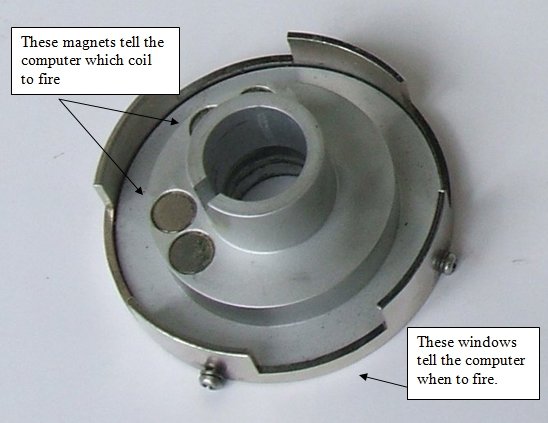
This rotating vane interrupts the magnetic field picked up by the
Hall-effect sensor.
The E-Timer is designed to work with 6
to 12V negative earth electrical systems. It will not work directly from
a magnetos AC output. For those with pre 1919 cars, it will be necessary
to provide a small battery, but these already exist in most cars for turn
signals and brake lights. Due to the low current consumption of an E-timer
ignition system, it would be quite sufficient to recharge the battery at
home after driving. However, fully independent magneto operation is still
possible using a suitable AC to DC power converter. The E-Timer is not
to be confused with the True-Fire; the latter being a complete replacement
ignition system which does not use the original coils.
If direct magneto operation is desired,
the I-Timer is now available.
Installation.
Although the E-Timer is a drop in replacement,
there are some important things to be attended to. The clearance between
the rotating vane and sensor is small, so its essential that the timing
cover be centred correctly, otherwise the sensor may be damaged. A properly
centred timing cover is just good practice anyway, even with a mechanical
timer.
The instructions recommend a neoprene
camshaft seal, but for my initial tests I kept with the original felt type,
as I knew the leakage was minimal. Indeed, after two months of running
there were only a few drops of oil in the timer casing. Subsequently, I
did install a neoprene seal in view of an E-Timer being a permanent fixture
in my car.
The timer connects to the wiring harness
in the usual way, but as with other U.S. sourced timers, it is installed
upside down in our Australian assembled Canadian RHD cars.
This means that the labelling for the
coil terminals is 180 degrees out. This in itself is not a problem, because
the firing order is the same, but one needs to know which particular coils
are connected to which terminal, as will be explained later. However, the
E-Timer can be supplied with the internal circuit board upside down to
conform with normal wiring in RHD cars, if this is preferred.
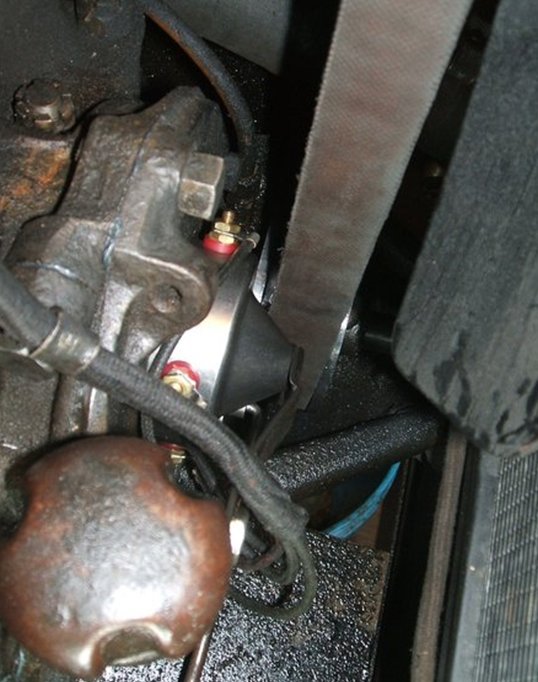
A purist cannot tell this car has an electronic timer.
Coil Modification.
Because the E-Timer also takes the function
of the coil points, the instructions explain how the coil points are bridged
out. Four fusible links are provided for the purpose. Purists can install
these inside the coils so theyre not visible, or they can be simply placed
under the nuts on the coil tops. The links are fusible to protect the wiring
of the car, and the coils, if there should be a short circuit in the wiring
to the timer. They will also protect the coils should they inadvertently
be put into a car with a mechanical timer.
The reason for this is that with points
bridged out, there would be nothing to limit the current if full battery
voltage is applied to the coil, as the points opening will no longer disconnect
the supply. Despite the coil points being bridged out, they still buzz
with the E-Timer because the magnetic field in the coil core is still being
rapidly interrupted. From an electrical point of view the points
are now superfluous and not required, unless for appearance or to retain
the sound.
It can be seen that with the points bridged
out that the capacitor is also bypassed. What this means is your original
100+ year old coils can be used in "as found" condition at full efficiency.
Even if the original capacitor is completely short circuit or open circuit,
it does not have to be replaced.
Although the E-Timer was designed to be used with bridged out coil points, it is possible to use it with the coil points still active, and not install the fusible links. This is how I use the E-Timer. The caveat here is that the coils must be set for equal dwell time on an electronic tester, such as the ECCT; otherwise the timing accuracy of the E-Timer may be negated. Set up thus, I dont have to touch the coils when changing from the E-Timer to a mechanical timer, and vice versa.
The E-Timer and the ECCT.
The question may now be asked, what if
I've already invested in an ECCT? Will it no longer be required? The answer
is no. By using your ECCT to set your coils, it means you don't have to
bridge out the points, making the coils instantly transferable to another
car without modification. In effect, it's the best of both worlds with
the E-Timer being a direct drop in replacement; no modifications needed.
Swap between the E-Timer and mechanical timer as much as you want with
absolutely no modifications.
Furthermore, your ECCT can continue to
help the ongoing demand for coil repair from those using a mechanical timer.
However, unless the owner has a thorough
understanding of the ignition system and coil dwell time, or does not have
an ECCT, the recommended instructions for bridging the coil points should
be followed.
Decrepit coils like this will work perfectly with the E-Timer provided the windings are good. The points and capacitor are optional.
Setting Up.
I set the initial timing like I would
for a mechanical timer, and most Australian owners do so that is, for
the No.1 coil to buzz just as the piston starts to leave TDC. However,
it has been the custom in the U.S. for initial timing to be set to 15 degrees
ATDC, and the instructions go into detail on how to do this. If in any
doubt, follow the instructions provided you dont want a Ford fracture!(i.e.
broken wrist/arm).
For my installation, I did not have to
adjust the timing rod after previously using Anderson and TW timers, but
it was still essential to check this.
Finally, the timer is ready to be programmed
for either manual timing, or automatic timing. With manual timing, you
drive using the timing lever in the usual way as when running on battery,
but in the automatic mode the timing lever is left fully advanced once
the car is started. The microprocessor in the E-Timer measures engine speed,
and retards the timing as necessary.
Programming is done in a most ingenious
manner. There are no switches or links. Instead, all but one of the coils
is removed, the ignition turned on for five seconds, and the other coils
replaced. Hence, the need to know which coils are connected to which terminals
on the upside down installed timer. Depending on which coil is left in
situ, the E-Timer knows which timing mode it should be in. It stays in
this mode indefinitely unless the programming is changed again. By default,
the E-timer comes with automatic timing selected, so the programming step
is skipped if you prefer this mode.
How does it perform?
On my first power up of the ignition system
with the spark plugs laid out on the cylinder head, as required to safely
verify correct timing, the improvement in spark quality was clear. Because
the coils are now being switched by the E-Timer and not the points, the
raspy and varying note of the buzzing points was now a consistent smooth
buzz.
Starting the car seemed easier, and this
was on a cold day. It was noticed that the idling was smoother and quieter.
So far I was quite impressed, but the real test would be to take it out
for a drive.
Immediately, the difference was obvious.
The smoothness over the entire rev range was something that I had not experienced
with a mechanical timer. Clearly, this could only be a good thing in terms
of bearing wear. As a result, the engine just ran quieter.
The most noticeable thing however, was
the much improved low end torque.
On a flat road it was possible to drive
the car just above idle speed and almost count each cylinder firing. With
this improvement, it was also found possible to change into top gear sooner
than normal.
In terms of top speed, this was
the same as I get with a mechanical timer with coils running on 6V; i.e.
about 75 km/h.
After the initial excitement with
the improved performance, it was time to do some other tests. As mentioned
previously, my coils were set on an ECCT and the points were not bridged
out. For the sake of completeness, I tested the E-Timer with the coil points
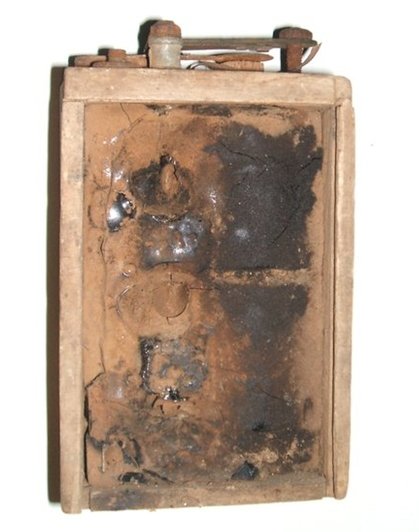
bridged out. For this test, I found four coils of unknown condition, some
with no points, and one even with a missing wooden cover (see pic above).
With windings tested, the point connections were bridged and the decrepit
coils put in the car. Needless to say, the car performed perfectly. I could
not detect any difference between the coils with the unbridged and bridged
points.
The final test was to compare the two
modes of timing. Initially, I had been driving with the timing on manual,
so as to give a better comparison to what I have been used to. In this
regard, the timing lever is adjusted exactly the same as with a mechanical
timer. I programmed the E-Timer for automatic timing and went out for a
drive on the same hilly route Id used for the previous tests. It certainly
does work, but feels strange at first climbing hills without backing off
the timing lever. Unless you know your cars optimum timing settings very
well, I would say the E-Timer does a better job in this mode. The length
at which hills could be ascended in top gear was impressive. I spent a
few weeks driving around with the automatic mode and became quite used
to it, but my preference is to adjust the timing as I drive, so I set it
back to manual. For someone new to driving Model Ts, the automatic timing
would very obviously be an advantage.
Automatic timing mode makes it more difficult
for a beginner to stall the car since the E-Timer will sense the low RPM
stall condition and immediately suspend automatic timing mode, automatically
retarding timing. Once all the other aspects of driving a Model T have
been mastered, then the timing can be adjusted manually if desired.
Conclusion.
Without a doubt, I vastly prefer the E-Timer
over the mechanical timer, not just in terms of the improved performance,
but for the consistency of this performance, and knowing it will stay that
way. While the cost is higher than that of a mechanical timer, its like
a new radiator once youve installed it and seen how good it is, the
cost becomes irrelevant. It is full electronic ignition performance, with
perfect timing that never needs maintenance, yet uses the original Ford
coils, wiring, and coil box. No other ignition system used by Model T owners
can provide all these features. For those wanting a more in depth description
of the E-Timer, I recommend Mike Kossors site http://www.modeltetimer.com/
The I-Timer.
Now available for those who wish to retain
direct magneto operation is the I-Timer ("Ideal" Timer). This is a development
of the E-Timer and is so named because it mimics more closely, the original
mechanical timer in operation. Basically it differs from the E-Timer in
that Triacs are used instead of IGBT's to allow operation from the magneto's
AC waveform. It does not however, include the automatic timing feature.
Also, the coil points are not bridged out, and therefore coils must be
adjusted correctly. Because the coil points are functional, it means that
the I-Timer can also be used on battery - the opening of the points is
required to reset the Triacs, which would otherwise latch on with DC.
However, although the I-Timer can run
directly from the magneto, a battery is still required for starting.
| Mechanical Timer | E-Timer | I -timer | |
| Direct magneto operation | Yes | No | Yes |
| Battery operation | Yes | Yes | Yes |
| Automatic timing | No | Yes | No |
| Coil points need to be bridged | No | Unless set on ECCT | No |
| Capacitor needs to be good | Yes | Not if points bridged | Yes |
| Coils must be correctly adjusted | Yes | Not if points bridged | Yes |
Which of the two electronic timers suits the owner best depends on several things. For those who cannot adjust or repair their coils, or who want automatic timing, the E-Timer is obviously the preferred choice. For those who prefer direct magneto operation and manual-only timing, and can set their coils correctly, the I-Timer is the one to go with. If the magneto fails, the I-Timer will continue to run on battery in the normal way.